Your front door is the first thing every trick-or-treater, guest and neighbor sees on Halloween, which makes it the best place to focus your decorating effort. A well-decorated door sets the mood, tells visitors that your house is a friendly stop and often costs far less than filling an entire yard with props. The best part is that a few good ideas can be done in an afternoon.
This guide covers Halloween door decorations for every style and situation: spooky, cute, elegant and vintage, plus options for renters, apartment dwellers, classrooms and offices. You will find step-by-step DIY projects, safety notes, lighting tips and a shopping approach that keeps the budget under control. Halloween 2026 falls on Saturday, October 31, so start now and you will have plenty of time to get it right.
Principles of a Great Halloween Door
Whatever style you choose, a few basic rules make a door look intentional rather than cluttered.
- Pick one focal point. A wreath, a door cover or a big graphic gives the eye somewhere to land. Everything else should support it.
- Limit your palette. Two or three main colors, such as black, orange and white, look more polished than a random mix.
- Add layers. Combine the door itself, the frame, the floor and the surrounding area, so the decoration feels like a scene.
- Think about light. Most trick-or-treating happens after dark, so lighting is as important as the decorations themselves.
- Keep the path clear. Visitors need to reach the door safely, especially if they are young children in costumes.
Easy Halloween Door Decoration Ideas
Spooky Spider Web Doorway
Stretch cotton or polyester web material across the frame, and add a few plastic spiders. It is one of the fastest and cheapest ways to create a spooky look. Pull the material thin, because thick clumps look messy. Never use webbing near open flames or hot lights, since it can be flammable.
Mummy Door
Cover the door with strips of white fabric, gauze or paper, leaving a gap in the middle for a pair of eyes. Use two large googly eyes or cut circles from white and black paper and place them in the gap. It is inexpensive, funny and looks great from the street.
Monster Mouth Entrance
Cut a large mouth from black paper or cardboard, add rows of white paper teeth and a red tongue. Attach it around the door frame so that visitors walk through the monster’s mouth. Kids love this one.
Ghost Door
Cut ghost shapes from white paper, felt or sheets, and stick them across the door in different sizes. A group of ghosts feels playful and friendly, and it is easy to change the expressions to suit your mood.
Pumpkin Door
Turn the entire door into a giant jack-o’-lantern with orange paper or paint and cut-out black features. If you are decorating a door you will paint, use painter tape and washable paint that is safe for the surface.
Wreaths and Garlands
A wreath is the classic Halloween door decoration. Choose a black or natural base and add orange ribbon, mini pumpkins, faux leaves or spiders. You can buy one or make your own by attaching decorations to a wire or foam ring with a glue gun or floral wire. Garlands hung around the frame add depth, and lights can be woven through them.
Door Covers
Ready-made door covers are printed sheets or fabric sized to fit a standard door. They come in themes such as haunted houses, monsters and pumpkins, and they are the easiest way to decorate a door in minutes. Check the dimensions against your door and the attachment method before you buy, and consider whether your weather conditions allow the cover to be used outdoors.
Halloween Door Decorations by Style
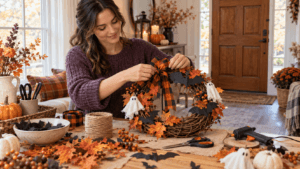
Cute and Friendly
For families with small children, keep things bright and non-frightening. Use smiling pumpkins, cartoon ghosts and pastel or bright color schemes. A welcome sign, a friendly bat garland and a row of small jack-o’-lanterns on the steps show visitors that this is a kid-friendly stop.
Spooky and Dramatic
If you love a scare, use darker colors, dim lights and creepy details. Add skeleton hands, a raven, cobwebs, faux candles and a sign with a haunted message. Consider adding sound effects with a small speaker, but keep the volume reasonable so it does not bother neighbors.
Elegant and Minimal
Not everyone wants plastic props. An elegant approach uses natural materials and a limited palette: a wreath of dried branches painted black, white pumpkins, black candles in lanterns and a simple sign. It looks good all autumn, and it is a good choice for homeowners associations with rules about decorations.
Vintage and Retro
Paper cutouts, honeycomb decorations, muted colors and old-fashioned cats and owls give a nostalgic look. If you like this approach, see our full guide to vintage Halloween decor for tips on finding and using vintage pieces.
Rustic Harvest
Hay bales, pumpkins, corn stalks and lanterns give a warm, seasonal look that suits the whole of October. Add a few Halloween touches, such as a scarecrow or a black cat, to make it feel spooky without losing the cozy feeling.
DIY Door Decoration Projects
DIY Paper Bat Garland
- Draw a bat shape on a piece of cardboard and cut it out as a template.
- Trace the template onto black card stock and cut out ten to fifteen bats.
- Fold each bat’s wings slightly for a three-dimensional effect.
- Glue or tape the bats onto a length of string, spacing them evenly.
- Hang the garland across the door frame with removable hooks.
DIY Glowing Jar Lanterns
- Collect clean glass jars in different sizes.
- Paint the inside with a thin layer of diluted craft glue and add pieces of orange or black tissue paper for a stained-glass effect.
- Let them dry fully.
- Place a battery-powered tea light inside each jar.
- Arrange the jars on the steps or the porch, keeping them out of the path.
DIY Cardboard Tombstones
- Cut tombstone shapes from a cardboard box, in varying heights.
- Paint them gray, and add darker shades for depth.
- Write funny epitaphs with a marker.
- Secure them with stakes or weights, and place them beside the door.
DIY Window Silhouettes
- Cut black paper into shapes such as cats, witches, trees and bats.
- Stick them to the inside of the windows next to the door.
- Turn on a light behind them at night for a striking effect.
Lighting Ideas That Make the Difference
Good lighting can transform a modest decoration into a scene. Keep these pointers in mind.
- Use warm or colored bulbs. Orange, purple or green lights create a Halloween feeling, and warm white lights create a cozy, vintage mood.
- Add string lights. Frame the door with lights or weave them through a garland.
- Choose flameless candles. They look convincing and are much safer around costumes and decorations.
- Spotlight the focal point. A small light aimed at a wreath or a door cover draws the eye.
- Do not make it too dark. Visitors need to see the steps. Keep the path lit for safety.
- Check that the lights are rated for outdoor use if they will be exposed to weather.
Options for Renters and Apartment Dwellers
If you rent or live in a building with rules, you can still decorate your door without causing damage.
- Use removable adhesive hooks and tape. Check that they are suitable for the surface, and test in an inconspicuous spot.
- Hang a wreath from an over-the-door hook. No adhesive needed.
- Use a tension rod inside the door frame to hang fabric or garlands.
- Read the lease and building guidelines. Some buildings restrict what can be attached to doors or placed in hallways.
- Keep the hallway clear. Fire codes often prohibit blocking corridors, so keep decorations close to your door.
- Use window decorations. If you have a window in your door or nearby, silhouettes and lights are easy to remove.
Classroom and Office Door Ideas
Schools and workplaces often hold door decorating contests, and you can use many of the same principles. Choose a theme, such as a haunted library, a monster of the month or a favorite story. Involve everyone in the design, and check the rules about materials and fire safety before you start. In classrooms, avoid small parts and sharp edges, and use paper and washable materials. In offices, use a pun that suits your team, such as a “spooky spreadsheet” or a “haunted help desk,” and keep the decoration professional.
Weatherproofing and Durability
October can bring rain, wind and cold, so make your door decorations last.
- Seal paper decorations. A light coat of clear sealer can help paper and cardboard resist moisture, but keep them under a porch roof if you can.
- Use strong fasteners. Wind can pull lightweight decor off a door. Use secure hooks and ties.
- Choose plastic or fabric for exposed areas. Reserve delicate items for indoors or covered spaces.
- Check after storms. Quickly fix anything that has come loose.
Safety Checklist for Door Decorations
- Keep flames away. Use flameless candles inside jack-o’-lanterns and lanterns, and keep flammable materials away from any heat source.
- Do not block the door. Make sure the door can open fully and that there is a clear exit.
- Avoid trip hazards. Keep cords taped down or out of the path, and make sure steps are visible.
- Secure heavy items. A falling prop can hurt someone.
- Consider pets and children. Avoid small parts that can be swallowed and props that can be pulled over.
- Test electrical items. Use outdoor-rated extension cords and keep connections dry.
Also think about timing. If you are expecting visitors, you will want your door ready before the first trick-or-treaters arrive. Our guide to what time trick-or-treating usually happens can help you plan.
Budget Tips for Halloween Door Decor
- Start with what you own. Baskets, jars, cloth and old sheets can become decorations.
- Make instead of buy. Paper and cardboard projects cost very little.
- Buy one focal piece. A single good wreath or door cover goes further than many small items.
- Compare prices. Check different retailers and read our Spirit Halloween savings guide and our guide to online shopping deal websites to help you spend wisely.
- Shop after Halloween. Seasonal items are often discounted after the holiday, which is ideal for next year.
- Reuse. Choose decorations that can also be used for autumn or for future Halloweens.
Pairing Your Door With the Rest of the Night
A decorated door is also a great backdrop for photos, so plan a quick family picture before you go out. Our family Halloween costume ideas can help with outfits, and if you are going to hand out treats, see our list of the best Halloween candy. If you are hosting guests, ideas from our Halloween party themes can help you extend the theme through the house.
Common Mistakes to Avoid
- Starting too late. Give yourself time to fix problems.
- Using too many colors. A limited palette looks better.
- Forgetting lighting. Decor that cannot be seen is wasted effort.
- Blocking the entrance. Keep the path clear and safe.
- Using unsuitable adhesive. It can damage paint or leave residue.
- Ignoring the weather. Rain can ruin paper and cardboard.
- Overspending. A few strong pieces are better than a cluttered display.
Decorating Different Types of Doors
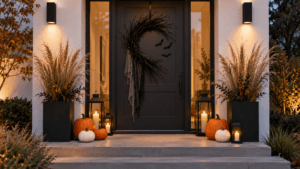
Not every entrance is a standard single door, and the right approach depends on what you have.
- Double doors. Treat the pair as one canvas. A single large graphic, such as a haunted mansion or a giant face, can span both doors, or you can create a mirrored design with a wreath on each side.
- Glass or storm doors. Window clings, silhouettes and hanging decorations work well, and lights behind the glass create a glowing effect. Avoid adhesive that could leave residue on the glass.
- Garage doors. A large, flat surface is ideal for a big monster face or a giant spider web. Use removable materials, such as fabric or plastic sheeting, and secure them so that they do not interfere with the door mechanism.
- Doors with a small porch. Use the space around the door with pumpkins, lanterns and hay bales, and let the door itself carry a simple wreath.
- Interior doors. If you are decorating inside for a party, use doors to create surprise. A “portal” doorway with hanging streamers or a darkened entry adds drama.
How to Make a Simple Halloween Wreath
A wreath is one of the most versatile and reusable door decorations. This easy version takes about thirty minutes.
- Choose a base. A grapevine, foam or wire ring works well. Black or dark bases suit Halloween best.
- Plan the layout. Lay out your decorations before attaching them. Place the largest items first, then fill gaps with smaller pieces.
- Attach the decorations. Use floral wire, a hot glue gun or strong craft glue. Take care with hot glue, and keep it away from children.
- Add ribbon. A wide orange, black or purple ribbon adds color and finishes the design. Make a bow, and tuck the ends behind the wreath.
- Create a hanger. Attach a loop of wire or ribbon to the back so that it hangs straight.
- Hang and adjust. Check the wreath from the street to ensure it is well balanced, and that it will not bang against the door.
If you make one, consider using materials that can be reused for autumn, such as faux leaves and small pumpkins, and swap in Halloween accents for October only.
Sensory-Friendly and Inclusive Decorating
Some visitors, including small children and people with sensory sensitivities, may find loud sounds, flashing lights and sudden movements overwhelming. You can still create a fun display while being considerate.
- Avoid sudden noises. Motion-activated screams can frighten young children and pets. If you use sound, keep it gentle.
- Skip strobe lights. Steady lights are more comfortable, and strobe effects can be a problem for some people.
- Make the path predictable. Avoid decorations that jump out at people or change unexpectedly.
- Offer a quieter option. A sign or a small separate bowl of treats away from the main display can help visitors who want a calmer experience.
Three Budget Tiers to Choose From
If you are not sure how much effort to put in, think of your door decoration in three levels.
- Quick and nearly free: A few paper bats or ghosts taped to the door, a jack-o’-lantern on the step and a warm light. This takes minutes and uses items you likely have.
- Moderate: A wreath or a door cover, a garland with lights and a couple of pumpkins. This gives a finished look for a modest cost.
- Elaborate: A themed scene with several props, layered lighting, sound and a coordinated color palette. This takes more time and money, and it is worth doing if you love the hobby or have many visitors.
Whichever level you choose, start early, check your lights and adhesives, and take a photo at dusk to see how the display looks when it is lit.
Frequently Asked Questions
What are the easiest Halloween door decorations?
A wreath, a spider web frame, paper ghosts and a ready-made door cover can all be done in under an hour with little cost.
How do I hang decorations on my door without damaging it?
Use removable adhesive hooks or tape suited to your surface, or an over-the-door hanger. Test a small area first.
What is a good Halloween door decoration for kids?
Friendly ghosts, smiling pumpkins and a monster mouth entrance are fun and not too scary.
How can I decorate my door on a budget?
Use paper, cardboard, jars and fabric you already own, and buy only one focal piece. Compare prices before purchasing anything new.
Can I use real candles in decorations?
It is safer to use flameless candles, particularly around costumes and flammable materials.
How do I protect door decorations from rain?
Choose weather-resistant materials, hang decorations under cover and secure them firmly.
Final Thoughts
A great Halloween door does not need a big budget or advanced skills. Choose a style, pick one focal point, add lighting and keep everything safe and tidy. Whether you make a mummy door in an afternoon or hang a simple wreath, the effort will pay off when the first trick-or-treater arrives.
For more seasonal inspiration, explore our Halloween collection.